I just finished the animation import ! all the code is on svn.

The only thing now is that all this formats are not always using compatible materials or textures and need to be edited.
There is two options I'm thinking about :

- adding a material editor in Maratis (complex and long to code but easy of use)
- converting the mesh in Maratis xml mesh file and editing the file by hand (easy to code but not easy of use)

The third option (maybe more realistic) is to start by doing option 2, then do option 1 in the future.

What do you think ?

677

(11 replies, posted in Scripting)

yes setBehaviorVariable and getBehaviorVariable are only there to access a behavior variables that is already there.

678

(11 replies, posted in Scripting)

Did you add a LookAt behavior on your trylare model in the editor ?
and is it the first behavior in the list (0 in the function access the first behavior of the object)

if trylare having a parent it is linked to ? a parent link might conflict with the look-at.

For gimp I found something about the alpha (in french) : http://docs.gimp.org/fr/plug-in-threshold-alpha.html

680

(11 replies, posted in Scripting)

Vegas : it's because the look at is using the Z axis (the one originally used by camera),
but to not have to re-export the character, use an invisible box and link your character to it.

Par : I'm not sure I understand what you mean.
Check first if the collision is detected, then check if your player name is "player" in the editor,
and that sensor is having a collision shape (in ghost mode I guess).

681

(24 replies, posted in Engine)

it uses a version control system (svn), if you are in windows you can use TortoizeSvn : http://tortoisesvn.net/

when it's installed, you have to "checkout" maratis svn to a directory in your computer :
http://www.igorexchange.com/node/87#checkout

use maratis svn adress in the URL field : http://maratis.googlecode.com/svn/

and it will download all the code (it can take some time)

682

(10 replies, posted in Scripting)

The code is corrected on svn, but I won't build it before the next version is ready,
you can build it yourself by installing a compiler (visual studio for windows, or gcc for unix), python and scons and by getting the code from svn.

683

(11 replies, posted in Scripting)

The setBehaviorVariable code is right, maybe the problem comes from the collision detection ?

684

(10 replies, posted in Scripting)

Your script is good, the problem comes from Maratis, I just found a bug.
The 3rd argument with the object was not implemented correctly in the code... oups

685

(10 replies, posted in Scripting)

if Cpos is far away enough it should be

686

(10 replies, posted in Scripting)

You add the object you want to test as last parameter :

point = rayHit(start, end, object)
if point then
    -- you hit "object"
end

687

(2 replies, posted in Bug report)

do you have a numeric keypad on your keyboard ?

688

(8 replies, posted in General)

I'm thinking to something, open "MiOSStandardRenderer.cpp"

int the function "MStandardRenderer::createShadowLight(MOLight * light)"

there is two lines like that :
render->texImage(0, shadowQuality, shadowQuality, M_UINT, M_DEPTH, 0);

can you try by replacing M_UINT by M_USHORT in case the hardware only supports 16bits depth texture ?

If it works I will update it on svn.

689

(8 replies, posted in General)

Thanks, I don't have a device to test, there is probably something to setup with the depth texture mode. There is maybe a special extension to use.

690

(8 replies, posted in General)

cool, thanks.

I hope the svn version will now be ok for new users.

691

(8 replies, posted in General)

There was a discussion about the Reference acting weird on this post : http://forum.maratis3d.com/viewtopic.php?id=66&p=2

It works as it on my machine but for someone else the Ressource had to be removed and re-imported to the project (don't know why exactly).

EDIT : I don't know if it will change something, but I updated the ios xcode project on svn to use a folder reference for the Ressources instead of groups.

692

(8 replies, posted in General)

Hi,

I have it running on simulator 4.3 with xcode 3.2.6.

Can you check if the files in the Ressources are not broken ?
It should have the Demo project with the maps/ meshs/ etc

Hi, there is also the script binding to finish before doing a release so I'm not sure, maybe february,
but I'll commit the code soon.

694

(9 replies, posted in General)

not necessary weight paint, use vertex groups, you can have exactly the same result.

For example, the torso of your robot :

1 : Object Modifiers tab > in the Armature modifier, select 'Armature' in the 'Object' field
2 : Object Data tab > add a vertex group with the name of the bone you want to skin the vertex group, here "Bone"
3 : go to edit mode > select all vertices of the torso > clic on 'assign' in the vertex group

do that for every piece of the robot.

695

(9 replies, posted in General)

What I mean is parenting to bones is not supported by the exporter.

You have to use vertex skinning to attach the vertices to the bone.

696

(16 replies, posted in Engine)

Hi,

the engine doesn't have a integrated feature for reading video.

But you can use a 3rdparty library, like libtheora (to read ogg theora video) : http://www.theora.org/
I did it for a project some years ago, unfortunately I don't have the code anymore.

You read the stream and send the result to a texture using MRenderingContext

Or using FFMpeg maybe, but I never tried : http://ffmpeg.org/

697

(9 replies, posted in General)

Hi,
there is no skinning, did you just parented each piece to the bones ?

the exporter only work with regular skinning and bones for animation.

698

(9 replies, posted in Scripting)

You have to understand that rayHit is like a laser detector in a spy film :

http://blogs.lt.vt.edu/blorg/files/2012/04/GetSmartLaser1-300x225.jpg

You have to give it the first point and the last point, and if something touch it it detect the intersection.

699

(9 replies, posted in Scripting)

B is not correct, you have to give the final point of the ray.

With the new release I'll show a simpler way to do it with the matrix operation, but for now it can be done like that :

http://www.maratis3d.org/wp-content/uploads/2013/01/rayHit.jpg

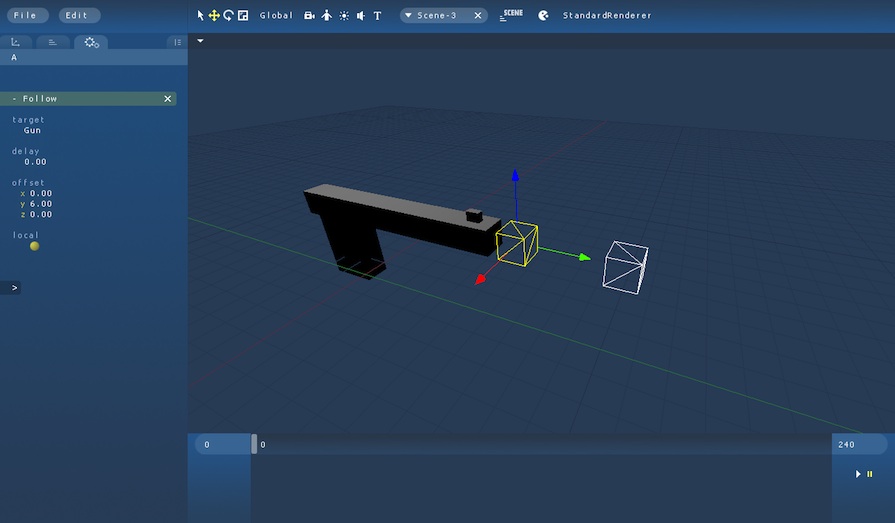
create 2 boxes A and B, don't link it to any objects (because getPosition return the local position if parented)
instead use the "Follow" behavior in "local" mode and set the offset to have A and B like the image (A for the tip and B to give the ray direction).

then in script :

Apos = getPosition(A)
Bpos = getPosition(B)
        
-- set Bpos further (1000 is the maximum distance, set higher if needed)
Bpos[1] = Apos[1] + (Bpos[1] - Apos[1])*1000
Bpos[2] = Apos[2] + (Bpos[2] - Apos[2])*1000
Bpos[3] = Apos[3] + (Bpos[3] - Apos[3])*1000

if onKeyDown("MOUSE_BUTTON1") then 
    point = rayHit(Apos, Bpos)
    if point then
        print(point)    
    end
end

700

(15 replies, posted in General)

Ok, there is multiple things that cause the problem,
in fact, if you launch a render from blender (F12), you'll see that the two textures doesn't show.

The first thing is because of the technique you used to assign multiple textures, it's something not very clear about Blender, there is two ways to apply multiple textures, the one you used is for blender internal engine using multitexturing. For exemple it's not used by Blender renderer or by the materials. I think it's something that should disappear from Blender.

So, the right way is to use materials, and in your case multi-materials, look at this tutorial : http://en.wikibooks.org/wiki/Blender_3D … Per_Object

To have a preview of what you are doing, press 'N' in the 3d view, in the panel that opens, go to 'Display' and select shading 'GLSL'. In textured mode, you might need to add a lamp or it will be dark. Add also a bit of emit in your material (0.35 for example).

Then, follow this tutorial to create your material : http://www.maratis3d.org/?p=277

specially this part for the order of the textures :

http://www.maratis3d.com/wp-content/uploads/2011/01/07.jpg