1

(59 replies, posted in General)

So, just to follow-up on a previous post of mine (#53) where I was asking for some assistance on GLSL stuff, so I could understand more of what I'm doing when I'm using these scripts...

I continued looking up tutorials on Google for GL Shading Language and did finally find one that seems (so far, anyway) to be what I was looking for. So far it's been helpful for me with wrapping my brain around it. We'll see how I fare once I'm done with it tongue

Here's the site/page...
http://www.lighthouse3d.com/tutorials/g … -tutorial/

Maybe it'll help someone else as well.

2

(59 replies, posted in General)

gamemaker wrote:

Sorry to continue to make this a tad confusing, but I seem to be atm. Using Maratis and setting up script is relatively easy, but getting those assets out of blender sometimes is challenging. I was using the simple texture painting method with only a uvmap and no stencil, but I understand that's limited texture wize and also eats up more ram, so that's not good.

I also need to clear up a mistunderstanding that I think is going in.

I commented on trying to be clear about something Ayulin was saying re: blendmap, and I mentioned 'is it a heightmap' in my response and he seemed to be indicating, that yes that's indeed it, but having gone back and verifying what was being said and the comments that followed, I think that's not the case.

It seems, as Anael eluded to, that the blendmap is what does the blending (glsl?), so I guess on this point Im confused, so could someone please enlighten me/us on 'how' to create this blendmap and what it takes to do that ? wink

I have googled, but Im finding absolutely nothing about it.

Thanks!
Gm

Heheh no problem.

It's not a heightmap literally.

I understood what you were getting at, since both heightmaps and the stencil map look similar... black, white and shades of gray.

The difference is that in a heightmap, each pixel determines the height/elevation of its corresponding vertex in a terrain mesh. In a stencilmap each pixel determines the opacity of a texture at that point of the object it's applied to.

To help clear it up... don't think of it as a heightmap at all. Completely different purpose.

Think of it more like a Layer Mask in Photoshop or Gimp, where the black, white and gray pixels determine the opacity of part of an image.

There might be a bit of confusion using "blendmap" versus "stencil map".. So to clarify that, let's go with the following...

"Stencil Map" = the black, white and grayscale image used for the multitexturing method I've demonstrated in this thread.

"Blendmap" = the color map where R, G, B and such determines where and how textures are "blended" on an object's surface.

They're two completely different methods of doing the same thing, except that the color blendmap approach seems to give better control and is a bit more straight-forward to use (setup of the GLSL code notwithstanding).

Hopefully that helps lol.

3

(59 replies, posted in General)

So, now that I'm ready to begin learning all this texture blending stuff, I'm looking through this thread at the various posts and, I have to admit, it's all going right over my head. I see numerous different examples of different scripts, some called "frag" some called "vert", but I don't know which I'm supposed to use, or if I should use both?

I also see some written for what seems like different combinations of texture layers, and I'm not sure which is which. I don't understand where in the script the textures are defined - or is that derived directly from the texture layer in Blender? It's all kind of confusing to someone like myself that's completely clueless in these things.

So, rather than trying to make heads or tails of all the different scripts posted here and what they're specifically doing, let me try something else... Please understand that posting a script and saying "here" is great, but if there's some kind of tutorial intended to show non-programmers how to set a model up with the correct texture settings, and with the correct GLSL code, that would be awesome. Providing the script is awesome, and quite generous.. but if I don't know what I'm looking at or where and how to use it, or what's doing what, it's all for naught.

The effect I would like to have is the ability to have, say, 4 texture layers, each with a normal map. So, in Blender it might look something like this:

Layer 1: Blend Map
Layer 2: Texture 1 (dirt, for example)
Layer 3: Normal Map 1 (for dirt texture)
Layer 4: Texture 2 (stone, for example)
Layer 5: Normal Map 2 (for stone texture)
Layer 6: Texture 3 (grass for example)
Layer 7: Normal Map 3 (for grass texture)
Layer 8: Texture 4 (second grass texture, for example)

Something like that...

What would I need to set up? Would I need one script, or two? Which types would I need to assign?

When would I use VertShad, FragShad, Z VertShad and Z FragShad?

Is there any basic instruction one what these are and what they're for?

I realize people have posted examples and such, but there's several different scripts, I'm not sure which situation I would use which script in, and none of it makes any sense to me. I've tried finding beginners' basic tutorials on GL Shader Language, but every one I've found assumes you're already familiar with Open GL Programming.. so it's clearly not a topic for "new programmers" to be able to pick up on easily... So, if there's just some basic instructions available somewhere saying "okay, you use this script to do "x", these specific parts control "y" and you'd apply it like "this" to accomplish "z"... that would be great. I don't know if such a thing can really be done, but well... can't hurt to ask, right? tongue

Thanks in advance smile

4

(59 replies, posted in General)

gamemaker wrote:

So Ayulin, you are saying that to save memory I should try using 512 textures, and making the stencils inbetween each texture 1024, correct ?

thx
Gm

Hey there..

Well I used those numbers as an example of the process itself; how you can work with 2 or 3 smaller tilable images and then blend them with a blend map.

The size for the blend map depends on how fine of detail you want in the texture blending. The more space you have in the blend map, the sharper and more "fine" the transitions can be, and in a smaller amount of space.

The the actual textures themselves, 512x512 is a nice image size if you're using a pattern that you want to repeat a lot (like a tiled floor, a generic ground/grass texture, etc) while maintaining enough variation so it doesn't look *too* repetitive. If you're using something that you want less repetition in, it might be better to use a somewhat larger image size... 1024x1024 might fit that perfectly. It all depends on your needs and what you need each individual texture/tile to do. I believe the dirt texture I'm using in my shot, with the small plants, is 512x512, and I'm able to get a nice degree of variation in there so you really don't see much of a recognizable pattern when it's tiled over a large area - that has a lot to do with how the texture is created, though.

As you work with that method and see the results, you'll get a feel for what you can get away with in terms of what size your textures and blendmaps are.  "Horses for courses", as the saying goes.

5

(59 replies, posted in General)

gamemaker wrote:

@Auylin,Anael,

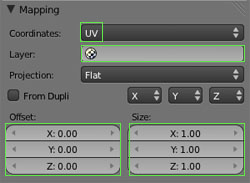
Thx anael for reminder about repeating textures, as I definitely need some of that on mine as they are far too stretched atm, even looking at them from the distance wink

To Auylin, I shall indeed try the RGBB as noted in this thread. I also want to mirror the fact that Im a much better artist and creative person, than programmer ( definitely right brain here too ), but hopefully as you noted, I can progress as I learn the finer details of programming and apply them for experience. Im sure you will find this to be true as well, that I have over time found I enjoy programming more than I thought I would  so it becomes easier as I go. Thankfully lua makes this learning curve a lot easier at least for scripting.

P.s.-When you referred to the stencil/blendmap in one of your prior posts above , and then mentioned their large sizes, were you referring to the heightmap you used for displacement, as that's what it sure sounds like; just wanted to make sure it was that and not something else, as if it's something else I have no idea what you meant by that reference of blendmap.


Ahh, so you can relate to the challenge of wrapping your head around coding then. Nice! Seems, though, that you have a better grasp on programming than I do. I have books on C++, Python, Java, and a few others... and I can't make progress with any of them. I get into the first couple chapters and it all just goes completely over my head. I don't know why. Maybe I'm making it more difficult than it actually is for myself? No idea. I just can't seem to grasp it, though I've tried. It would make my life a lot easier if I knew how to implement things myself, rather than having to hope I can find an engine that does it for me, or hope someone else could help me with doing so, which is a stretch. In my experience, professionally and personally, programmers tend to be protective of what they know. I say this having been good friends with two programmers for many years. One was happy to share whatever they knew, the other was like "No I won't share or explain my code! Learn it yourself!".

As for the stencil map, yes, that's what I was referring to with large sizes. Because the blend map is only controlling what is hidden or shown, and doesn't provide any color/detail itself, you can tend to get away with a lower resolution image than you might if you were using a single image map. Of course, using a higher resolution stencil map allows you to paint in finer details, which might be preferable, but I've yet to see a situation where that's been *super* important.

Look at it like this... If you're using a single image as a UV Map that covers the entire model, the only way you can maintain a high level of pixel density/image resolution is by using really large images (4096x4096, etc). Those can eat up quite a bit of memory when they start adding up.

For a system that uses a stencil map, or a color map (both serve the same function, just in different ways), you can be using individual tiling textures that are maybe 512x512, and then a single color/stencil map that controls their visibility/blending on the object. And that color/blend map can be 1024x1024, or maybe even 512x512 if you're using it in an area that doesn't require a lot of fine blending.

I just find that you can get far more detail with a significantly lower memory cost using the blend-map approach, than you could using the UV map approach.

Now that's in terms of file size and memory cost. I don't know what the cost is in terms of processing overhead to tile the image layers and blend them, versus just laying a single UV image over an object. I'm sure the processing cost is higher, but how much higher? I don't know. Considering many games I've played use the tiled texture/blendmap approach, I'm assuming it's not very significant.

Edit: I had a thought after posting this. When you're setting up these materials via the texture blend scripts, is Blender, or Maratis for that matter, loading the textures into memory for each individual object? Or, is it just referencing the images on disk, so it only has to load them once? I'm thinking in terms of efficiency when you have many objects using the same textures. For example, in my current prototype project, many of the objects are going to use the same textures (grass, dirt, stone, etc). So, instead of the textures being loaded up for each object using them, if they could be sorta "pre-loaded" into memory, and then simply referenced for each object using them, I imagine that would save a lot of memory as well. It's kind of a form of instancing, essentially.

6

(59 replies, posted in General)

anael wrote:

The RBG blendmap is normally working good, you can use each component to mix different textures and you can use tiling.

Just to clarify, there is two ways to tile your texture :

- directly in the uv (by scaling your uv down)

- or/and by using the texture size (from the doc) :

http://www.maratis3d.com/wp-content/uploads/2011/01/10.jpg


Be also sure that your texture is in repeat mode :
http://www.maratis3d.com/wp-content/uploads/2011/01/09.jpg


Oh that's excellent! So Maratis does support Blender's "repeat" functionality then? That's sweet! That means I don't have to use two UV sets tongue. Beautiful!

Okay, well I've been in "documentation and logo/site design mode" for my project since the end of this weekend, but I'm definitely going to dive more into this soon. It's fun being the only person covering all aspects at the beginning of a project. A ton of work.. but fun... except for the documentation part. I hate documentation.

PS: I don't know if anyone else has this issue, but for some reason, the first time I submit a post I've typed up, most of it gets chopped off. I have to edit the post and then re-submit it for it to show the whole thing. Very odd.

7

(59 replies, posted in General)

Hey there, GM...

Yeah, I hear ya. I have a normal baked UV map that I've tested out. It works. I just don't like how much detail is lost. If I were to go that way with my texturing on larger objects, I'd have to make sure the textures I'm using aren't quite as "granular" in their detail, but are a bit more homogeneous.

If you're going to use the blendmap approach, I'd go with the RGB Blendmap approach described in this thread. That gives you access to more textures per object, since it's based on color (R, G, B and Black) and not just black or white. I'm going to use that approach myself. I just need to learn how to use the GLSL scripts myself. I'm entirely Right-brained, so figuring out anything to do with programming is an uphill battle for me. But I'll figure it out.

And I know there's a way to control the tiling/repeating of the textures through GLSL as well. I just need to find it.

8

(59 replies, posted in General)

gamemaker wrote:

I'm sure someone will respond who understands what you're after, as this whole talk of tiling has be a tad confused.

A well designed texture, WILL tile, so Im not exactly sure what you are asking wink

There are specific applications you can get/buy that do this, tiling ,and do it well, then again textures are by their nature, tileable 'enough'.

I saw your screenshot, and I used to go that confusing 'stencil' way, but I find its largely unnecessary, unless it has something to do with your tiling needs  ? I've got no idea on that front, as I'm barely just at the point I am with blender to even to multitexturing in the first place.

I am simply doing the whole unwrapping of my mesh, adding a new image in UVmap section , and then I simply just add all the textures I want to work with in the add texture area of blender ( next to new material of course),and then I go into the 'texture paint' , and add new textures ( using texdraw ) as I need them using the >Textures section. It works perfectly and I do not have to worry about stencils , and it exports into Maratis just perfect, without the need of any fancy shaders,and using 'pacman' from Maratis editor has it working just fine,and it looks like it does in blender.

Hey there.. Thanks for the response!

To clarify what I mean by "tiling", I could also say (and maybe should have said) "repeating across a surface". Basically, you can have the texture repeat a certain number of times across the UV surface.  So, when you have a seamless tiling texture, it will repeat across the surface as many times as you need it to, in much the same way you'd tile a texture across a heightmap terrain.

Here's a shot taken inside Blender where I have the texture(s) repeating across the surface. You can see how sharp/crisp the textures remain, and they'd remain just as sharp/crisp no matter how large the surface is that I'm tiling them across. That's two different texture layers blended via a stencil texture which I can paint directly on the mesh in Blender. The repeating textures just "flow" right on across the surface.

Aside from getting clearer/crisper results, I also have the ability to increase or decrease the number of repetitions across the surface by scaling the UV for each texture layer up or down as needed/desired.  In that picture, I believe I have each of the two textures repeating about 10-12 times across the object (they're fairly large texture images).

Another benefit to that approach is that I can use seamless textures that are, maybe 512x512 which would be pretty small in file-size (esp. using DDS format). The only large image is the stencil/blendmap, which can be 2048x2048, or even 1024 x 1024, without concern for loss of too much detail because it's just a grayscale image and there's no texture detail to worry about. So, you can get a lot of detail for relatively low memory cost.

Painting a UV texture directly, as you describe, is the approach I'm using for objects that are smaller and don't require as much pixel density to maintain their level of detail. For larger objects, though, such as large stretches of ground, or large cliff-sides, etc, I feel the multitexture approach, with repeating textures is the best way to go.

I've tried the direct texture-painting approach that you describe, but I'm never really happy with the results. I don't like how the texture "shrinks" or "grows" depending on how close or far you are from the object while painting. Although, it has its uses if you're painting a rather homogeneous texture and want to paint over anything that would betray a repeating/tiling texture. For things with fine detail that you want to keep consistent (like in my screenshot with the dirt and small plants), it's really not ideal.

Not sure if that helped at all lol.. but there you go.

9

(59 replies, posted in General)

Hi all,

Sorry to bump an old thread, but I thought it would be best to ask in one that's already in-progress (where it's relevant) than to start a whole new one...

I was referred to this thread, from this one that I started recently asking about a related topic.

This info (on multi-texturing using the RGB channels) is quite helpful and definitely something I'll be working on learning, though it's a bit over my head at the moment.

What I'm looking to do, in addition to the multi-texturing/blending, is to allow for the textures on each layer to be tiled. Now, there are a variety of ways to do this. I can do it in the modeler by assigning the textures to a unique UV map that's scaled up several times so the texture is automatically repeated. This requires at least 2 UV sets to be created, though. One would be used for the "tiling" effect and would be scaled up. The other would have to remain at 1:1 scale to be used for the stencil or color map(s).  Alternatively, I can use Blender's "repeat" or "size" options for each texture layer to the same effect.

I don't know if Maratis supports any of  those 3 options, though.

I'm aware that there's a method through GLSL where you can control the tiling of textures across a surface, and I know I've seen it discussed with other game engines (specifically 3DGame Studio), although it related to the terrain system, and not polygon soup meshes. I'm not familiar enough with the topic to know if that would make a difference.

I'm curious if there's a way to achieve this texture tiling via GLSL with Maratis? If so, then I believe I have a 100% solution to what I'm trying to achieve for my project. Just a matter of learning how to use it.

Thanks!

10

(4 replies, posted in General)

Ah, so it *is* possible then? Well that's good news!

I will have to look into that smile.

I'd moved on to use Torque3D since it's pretty

11

(4 replies, posted in General)

Hmm.. Looking through the documentation, it looks like Maratis doesn't actually support that. Well that's a bummer :-/.

12

(4 replies, posted in General)

Hello,

I'm posting this in hopes that maybe Maratis can be the solution I'm looking for in creating a prototype for a game project. I've spent so much time trying out different engines and all of them come up short. I'm hoping Maratis is the exception tongue

So, as I noted, I'm looking to create a prototype for a game project I've been working on. As it's a "microbudget" project, I'm relying on either very inexpensive or (ideally) free/source applications to make it work. I'm entirely "right-brained" and thus, work entirely in the creative side of things, although I do understand more technical stuff at a 10,000 foot level. I'm just lost if I try to actually do anything with them hands-on tongue.

So.. here's what I'm looking to do, and have been unable to in other engines so far.

I'm looking to create assets that support a system of multi-texturing, using multiple texture layers in a given material. It's difficult to explain, so I'll just show you a screenshot of my Blender layout that should illustrate what I'm after.

You'll notice that, in Blender anyway, the Maratis setup seems to handle it just fine. However, I don't know if that's Blender handling it, or if it means that Maratis can handle this. This is why I'm asking here tongue.

Here's the screenshot

Here's the specifics of this setup, so people know exactly what I'm trying to achieve...
1. I setup 2 basic, tilable textures, each assigned to a texture layer within the material (layers 1 and 3)
2. I create, or import, a 3rd image which acts as a "stencil map" to blend between the two color texture layers. (layer 2)
3. I create a UV channel to which the two color textures are assigned. This allows me to scale up the UVs of the object I'm texturing to adjust the tiling of the textures.
4. I create a second UV channel specifically for the stencil map, which is kept at a 1:1: scale. This becomes the basis for me to paint the stencil map and control the blending of the two texture layers.

The result is what you see in my linked screenshot.

My question is... Is this directly supported in Maratis? Will Maratis "know" how to handle those layers, the UV channels and the textures applied, to yield the same results as what's shown in that screenshot?

If it does, then Maratis will likely become my tool of choice for my prototype project.

I hope I explained that well, and thanks for any help/feedback!