Topic: Creating 2D Cutouts for Maratis using Blender and Gimp (Grass Edition)

Creating 2D Cutouts for Maratis using Blender and Gimp (Grass Edition)


This is a Prototype Tutorial, that I will be adding to the wiki, It's the first of many. I am posting it here first to get
feedback on its presentation and to test my image hosting. I dont personaly do well with video tutorials and much
more prefer them in this context.


Software Used
--------------------------
Blender v2.63
Gimp v2.8.2


There are 3 choice methods to creating 2D Cutouts:

    1. Custom (Slowest Most Desired Option) Involves Modeling, Painting & Rendering your Cutout(Grass, Tree, ...)
    2. Create a Cutout from an UnPrepared Image (Medium Most Likely Option)
    3. Create a Cutout from a Prepared Image (Fastest but Least Desired) Note: Gimp Not Needed, Start at Step 6


The following tutorial applys to Options #2 & #3


Step 1:
Choose any image with a solid background, here I have choosen an image with a white background.


Note: Here is the image I used to make this tutorial
https://lh6.googleusercontent.com/-ogIFnnd0lQQ/UO_SByxnEHI/AAAAAAAAAk0/KaNKIdj7Has/s400/16121686-green-grass-cut-out-isolated-on-white-background.jpg


Step 2:
Open your chosen image in gimp.
https://lh3.googleusercontent.com/-77Qpd2rlmkQ/UO--vqWlgxI/AAAAAAAAAjc/odhPjAS4HGU/s800/image1.png


Step 3: Use the "Color to Alpha" tool to remove the background color.
https://lh5.googleusercontent.com/-JDT7TVrkQJs/UO--vVPYxuI/AAAAAAAAAjU/745wYo7ysL0/s800/image2.png


Step 4: Click "Ok" or choose the background color by clicking on the "Color Dialog Button" and using the Eye Dropper Tool
https://lh6.googleusercontent.com/-aQEMQg9Giwo/UO--wrP8tDI/AAAAAAAAAjs/UOHexo2Qnb0/s468/image3.png


Step 5: Export your image as a "PNG" to your projects "maps" folder Note: The JPEG format does not have an Alpha channel and cant have transparent backgrounds so dont use that.
https://lh3.googleusercontent.com/-suAU6KXbzs0/UO--wikxU5I/AAAAAAAAAjk/XlQ0b_lVqxA/s800/image4.png


Step 6: Start up Blender and open the "User Preferances"
https://lh4.googleusercontent.com/-2rf73aIY1jM/UO--w8CVx9I/AAAAAAAAAjo/yS341mvf4qk/s450/image5.png


Step 7: Click on the "Addons" tab and then "Import-Export"
https://lh6.googleusercontent.com/-q6PZYhK06n8/UO--xckxkuI/AAAAAAAAAjw/-pwlewnYGeI/s803/image6.png


Step 8: Scroll down the list untill you find "Import Images as Planes" and click on the checkbox to enable it then click on "Save as Default" at the bottom of the Dialog.
https://lh6.googleusercontent.com/-tWgpNtchtac/UO--xnzktJI/AAAAAAAAAj0/LwgbQvFJi34/s805/image7.png


Step 9: Import the Grass image we had exported from Gimp earlyer.
https://lh6.googleusercontent.com/-79UKs5rZM1o/UO--yKvuNeI/AAAAAAAAAj8/038Vgthe8P4/s640/image8.png


Step 10: Admire your Grass wink Note: you will want to rotate your image, as of right now it is laying flat on its back.
https://lh4.googleusercontent.com/-ERb9k9FQYG8/UO--yqLW0xI/AAAAAAAAAkE/4gb8YyOcueQ/s912/image9.png


Step 11: Unless you want "Shiney Grass" turn "Speculary Intensity" in the "Materals Tab" all the way down.
https://lh3.googleusercontent.com/-7vqeSVlq5Rk/UO--vGWr1HI/AAAAAAAAAjQ/tKTbMTBqG2U/s294/image10.png


Step 12: Export your Mesh using the Maratis export plugin to your projects "meshs" folder and then Import it into the Maratis Editor, Rotate, Duplicate, Scale, Move them around and your Done.
https://lh6.googleusercontent.com/-2VWhrPa14-g/UPB1uQ-kGLI/AAAAAAAAAls/pde-AQevX9Y/s912/image11.png

Last edited by zester (2013-01-11 20:28:27)

Re: Creating 2D Cutouts for Maratis using Blender and Gimp (Grass Edition)

That's a fantastic shortcut to create that type of object.

Re: Creating 2D Cutouts for Maratis using Blender and Gimp (Grass Edition)

Nice tutorial, however for me alpha in Gimp never -ever- worked as expected ;
i always get a full semi-transparent image hmm
PunBB bbcode test
Any tips on this ?

Re: Creating 2D Cutouts for Maratis using Blender and Gimp (Grass Edition)

Vegas wrote:

Nice tutorial, however for me alpha in Gimp never -ever- worked as expected ;
i always get a full semi-transparent image hmm
PunBB bbcode test
Any tips on this ?

You need a copy of your cutout but it needs to be the color of the original background, you then paste it as a new layer, set it below the image you have there and merge.

So if the background of your image was white then you want the image you have there and a copy of it with a transparent background that is solid white. And you merge the two copys the color version on top and white on bottom.

Last edited by zester (2013-01-14 23:19:34)

Re: Creating 2D Cutouts for Maratis using Blender and Gimp (Grass Edition)

You can also try duplicating the layer a couple of times and merging those copys to gether thats what I do most of the time, it seams to workout fine.

Re: Creating 2D Cutouts for Maratis using Blender and Gimp (Grass Edition)

Hmm there's still some transparency on the final image, the edges of the main grass/vegetation are also a bit weird hmm

I deceided to try my luck with imagemagick, i'm making a script that automates everything (masking,alpha and combining) it's almost done, only one small problem to correct and it's a one-click win wink 

Gonna post it here once it's ready, could be an alternate method

Re: Creating 2D Cutouts for Maratis using Blender and Gimp (Grass Edition)

Vegas wrote:

Hmm there's still some transparency on the final image, the edges of the main grass/vegetation are also a bit weird hmm

I deceided to try my luck with imagemagick, i'm making a script that automates everything (masking,alpha and combining) it's almost done, only one small problem to correct and it's a one-click win wink 

Gonna post it here once it's ready, could be an alternate method

Looking forward to trying that out. One click win sounds good!!! lol wink

Mine dont always turn out perfect eather, I get this weird haze around my image especialy if I use the lasso tool. Sometimes I have to fix the transparent or missing parts with the clone brush. But for me its generaly worth it.

Last edited by zester (2013-01-15 22:19:41)

Re: Creating 2D Cutouts for Maratis using Blender and Gimp (Grass Edition)

For gimp I found something about the alpha (in french) : http://docs.gimp.org/fr/plug-in-threshold-alpha.html

Re: Creating 2D Cutouts for Maratis using Blender and Gimp (Grass Edition)

anael wrote:

For gimp I found something about the alpha (in french) : http://docs.gimp.org/fr/plug-in-threshold-alpha.html

7.37. Alpha level

Converts the alpha threshold regions partially transparent areas of the active layer completely transparent or opaque. The user specifies an alpha level (0 ... 255) which will be used to separate the regions that will become clear to those who may become opaque. This only works on RGB images with an alpha channel. If the option Keep transparency is checked in the Layers dialog, this command will cause an error message.

7.37.1. Access control
You can access this command from the image menubar through Layer → Transparency → Alpha Threshold .

7.37.2. Description of the dialog

    Figure 16101. The only option dialog "  Threshold Alpha  "
    http://docs.gimp.org/fr/images/menus/layer/threshold-alpha.png

Threshold
With this option, you can set the transparency value to be used as threshold. You can do this using a slider or by entering a value in the text box, between 0 and 255. All transparency values above this threshold will be made opaque and values below this threshold will be made completely transparent. The transition is abrupt.

Note
This command will never completely transparent (alpha value = 0) opaque pixels.

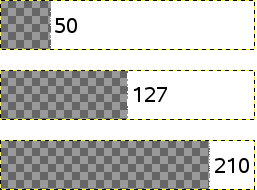
Figure 16102. Example Threshold Alpha


A transparency gradient 0-255
http://docs.gimp.org/fr/images/menus/layer/threshold-alpha-example.png

Alpha level set at 50, 127, 210
http://docs.gimp.org/fr/images/menus/layer/threshold-alpha-example3.png

Re: Creating 2D Cutouts for Maratis using Blender and Gimp (Grass Edition)

Hmm verious settings from a single image w/o layers :

PunBB bbcode test

Re: Creating 2D Cutouts for Maratis using Blender and Gimp (Grass Edition)

This is what I get from the link anael posted.

https://lh5.googleusercontent.com/-ht7Jtb8BDZg/UPXfJJzT8uI/AAAAAAAAAws/HnEP70WupOA/s800/Capture8.png
https://lh5.googleusercontent.com/-ufzDWevdXRI/UPXf6yEkCuI/AAAAAAAAAw4/pgykOa22c8g/s800/Capture9.png

Fixed that weird haze problem also.

Thanks anael wink

Last edited by zester (2013-01-15 23:04:19)

Re: Creating 2D Cutouts for Maratis using Blender and Gimp (Grass Edition)

What the hell ? Why is mine all crappy sad

Re: Creating 2D Cutouts for Maratis using Blender and Gimp (Grass Edition)

Vegas wrote:

What the hell ? Why is mine all crappy sad

lol post your image let me look.

Re: Creating 2D Cutouts for Maratis using Blender and Gimp (Grass Edition)

It's just below your last picture =p

Re: Creating 2D Cutouts for Maratis using Blender and Gimp (Grass Edition)

Vegas wrote:

It's just below your last picture =p

Do you have the original the ones you posted are screenshots and have the checkered background. Also if your image is to low of a resolution then the method anael posted wont work and just make it worse. You would have to manualy doctor the image to get it to look right. My leafs are freaking hugh just look at the resolution on the window titlebar for gimp 3295x5000. If you printed that thing out you could make a life size leaf cape.

Last edited by zester (2013-01-15 23:18:34)

Re: Creating 2D Cutouts for Maratis using Blender and Gimp (Grass Edition)

Yup indeed, that image is a low res 1600x1200, that should be that hmm
oh well, at last it's good to know this alpha trick in gimp, thanks guys smile

Re: Creating 2D Cutouts for Maratis using Blender and Gimp (Grass Edition)

Vegas wrote:

Yup indeed, that image is a low res 1600x1200, that should be that hmm
oh well, at last it's good to know this alpha trick in gimp, thanks guys smile

1600x1200 shouldnt be giving any major problems.

This is 600x600

https://lh3.googleusercontent.com/-dObxnbQWWDU/UPXoPXsYK1I/AAAAAAAAAxM/NZx_Ih1t6Nw/s800/Capture11.png
https://lh3.googleusercontent.com/-rycFy68k97I/UPXoSSSc1xI/AAAAAAAAAxU/WE4Rp0HNOeA/s800/Capture12.png

I will just go around it with the eraser and then smooth the edges and fix the missing pixels with the clone tool. Cutouts are 90% of the time alot of work.

Last edited by zester (2013-01-15 23:41:11)

Re: Creating 2D Cutouts for Maratis using Blender and Gimp (Grass Edition)

have no problem doing this in paint.net. I'll show some paint.net stuff this weekend. smile ( including the automatic normal map generator)

Re: Creating 2D Cutouts for Maratis using Blender and Gimp (Grass Edition)

Wrapscallion wrote:

have no problem doing this in paint.net. I'll show some paint.net stuff this weekend. smile ( including the automatic normal map generator)

That sounds like a great idea.

Last edited by zester (2013-01-18 01:34:57)