Thank you Akira_san !
I'll come back to you when we have the team.
Windows 64 bit someone ?
You are not logged in. Please login or register.
Maratis forum » Posts by anael
Thank you Akira_san !
I'll come back to you when we have the team.
Windows 64 bit someone ?
Everything is installed in the "prod" directory,
for you probably in : D:\Maratis_SVN\trunk\dev\prod
normally Scons needs python 2.4 or later
Dear community,
as you may know, the binaries available on Maratis website are out of date and the only way for users to get the latest version is to compile Maratis themselves. The current svn trunk code is stable and provides a lot of bug fixes, it's time to release new binaries !
This is an official call for help, we need contributors to maintain the 3 major system builds.
You will have in charge the maintenance of the SVN trunk build system and the building of the official releases for your platform.
- We need a Windows build maintainer for 32 and 64bits
- And a Linux build maintainer for 32 and 64bits
- I will maintain OSX and iOS-simulator builds, but a iOS-device tester is welcome (I don't have access to iOS devices)
Lets provide together regular releases for the community !
How to build : http://wiki.maratis3d.org/index.php?tit … ng_Maratis
SUMMARY : building and testing
- Linux 32 : ishands : link
- Linux 64 : bryce : link
- Windows 32 : Akira_san : link Vegas : link
- Windows 64 : ulbex proposed his help
- Max OSX 32/64 and iOS : Anaël : link
please test and give feedbacks !
Changelog :
- performance improvement
- minor bug fixes and cleaning
- editor: edit light-color/text-color/gravity didn't update correctly
- X11 fullscreen mode fix
- joystick support for linux
- lua : corrected setParent 0 to unlink objects
- activate/deactivate physics bug
- Standard renderer fix (reset m_currentCamera at the end of drawScene)
Update about the implementation:
The new editor using MGui2 is on progress inside the experimental branch, I had to clean and recode all the editor part, and now the base is working, with a flexible (and extendable) design.
I also corrected some of the engine code and implemented missing features. The editor selection code was reworked using a better raytracing system, it's faster and allows to select objects from front to back (objects inside other objects could not be selected easily).
I added directional lights in the renderer and the editor view, and started implementing the new GUI with a theme/preference system :
There is still a lot of work, and it's hard for me to find free time because of my professional activity, but it's moving !
"gl_FragColor = vec4(pixel.r,pixel.g,pixel.b,0.2)" is correct.
But you need to select the correct Blending mode in the material to see it :

Interesting,
Maratis engine is licensed under Zlib/libpng,
note that MIT is not the same as Zlib/libpng : http://opensource.org/licenses/zlib-license.php
Hi,
there is a sample here : http://www.maratis3d.org/download/render-to-texture.zip
It's already a texture, you don't need to send it again to the rendering context.
You don't even need to send it manually to the shader :
- reserve a texture slot in blender for your reflection texture, link a dummy texture for example "water-reflexion-dummy.jpg"
- in script call "enableRenderToTexture" using the dummy texture name "water-reflexion-dummy.jpg"
http://wiki.maratis3d.org/index.php?tit … rToTexture
- in your shader use the texture slot using the dummy texture
You just need to get your hands into vector mathematics,
there is some good introductions online, I found this : http://www.matrix44.net/cms/notes/openg … th-vectors
Because your problem is just about mathematics, your need to understand how to handle vectors in a 3d world, then it will be a piece of cake.
There is two ways to solve your problem :
1 : use physics and modify the gravity vector like stated above depending on the player position and the planet center
2 : move the player yourself using vector and matrix math :
- get the player position
- move the player position orthogonally to the planet radius
- keep the player to the surface : force the distance of the vector |playerPos - planetCenter| to be always equal to the planet radius
I just meant to check if the function was called, because "if (material)" and "if (FXRef)" needs to be true.
You can just use a printf to be sure you enter the code :
render->sendUniformFloat(fxId, "Time", &time);
printf("send uniform now\n"); // DEBUG
if "send uniform now" doesn't appear in the console, it means you don't enter the code.
It looks ok,
did you check if "render->sendUniformFloat" is called ?
also, are you sure the shader is linked to material 0 of Entity0 ?
the line "if(! game->isRunning()) return;" means the code will only run when you play the game (pacman button).
Not right now, but it can be done in c++ :
    float time = 0.0f;

    MMaterial * material = mesh->getMaterial(0);
    if(material)
    {
        MFXRef * FXRef = material->getFXRef();
        if(FXRef)
        {
            unsigned int fxId = FXRef->getFXId();
            render->bindFX(fxId);

            // send uniform variable
            render->sendUniformFloat(fxId, "time", &time);

            render->bindFX(0);
        }
    }
Or you can use a trick :
- in Blender, animate a material variable you don't use in your shader : "MaterialShininess" for example
- use "uniform float MaterialShininess;" as your time variable
use this as a vert shader :
// engine default attributes and uniforms
attribute vec3 Vertex;
attribute vec3 Normal;
attribute vec3 Tangent;
attribute vec3 Color;

attribute vec2 TexCoord0;
attribute vec2 TexCoord1;
attribute vec2 TexCoord2;
attribute vec2 TexCoord3;

uniform mat4 TextureMatrix[4];
uniform mat4 ModelViewMatrix;
uniform mat4 ProjectionMatrix;
uniform mat4 NormalMatrix;
uniform mat4 ProjModelViewMatrix;

// custom varyings interpolated to the pixel shader
varying vec2 texCoord;
varying vec4 position, color;

// vert main
void main(void)
{
    position = ModelViewMatrix * vec4(Vertex, 1.0);
    texCoord = (TextureMatrix[0] * vec4(TexCoord0, 1.0, 1.0)).xy;
    color = vec4(Color, 1.0);

    gl_Position = ProjModelViewMatrix * vec4(Vertex, 1.0);
}the fixed renderer use the 3d card fixed pipeline, that was before the invention of shaders (mostly deprecated on desktop)
Wikipedia : https://en.wikipedia.org/wiki/Fixed-function
the standard renderer uses the 3d card shader pipeline.
Hi,
I will have a look at your shader and come back to you.
for now, please look at these shader examples : http://www.maratis3d.org/?p=548
Maratis doesn't use gl_Color, gl_MultiTexCoord0 or gl_TexCoord (they are deprecated)
here is a basic shader from the link above :
VERT:
attribute vec3 Vertex;
attribute vec2 TexCoord0;
uniform mat4 TextureMatrix[8];
uniform mat4 ProjModelViewMatrix;
varying vec2 texCoord[1];

void main(void)
{
    gl_Position = ProjModelViewMatrix * vec4(Vertex, 1.0);
    texCoord[0] = (TextureMatrix[0] * vec4(TexCoord0, 1.0, 1.0)).xy;
}
FRAG:
uniform bool AlphaTest;
uniform float MaterialOpacity;
uniform sampler2D Texture[8];
varying vec2 texCoord[1];
void main(void)
{
    float w = texture2D(Texture[0], texCoord[0]).w;
    if(AlphaTest)
        if(w < 0.5) discard;
    gl_FragColor = vec4(1.0, 1.0, 1.0, w * MaterialOpacity);
}Hi and welcome !
The binaries have not been updated on the downloads page for about a year, but the svn source code was updated last month.yes, the binaries should really be updated, I'll try to do something soon, the new experimental branch for the future version of Maratis was more work than I taught, with a lot of code rewrite.
Hi,
welcome !
Did you worked your animation at 60fps in Blender ?
To have the good preview, set the frame rate here in Blender :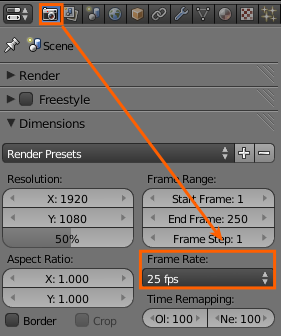
You may also need to set the playback sync mode to "AV-sync" (in the timeline windows)
yes, it was already corrected in the code :
https://code.google.com/p/maratis/source/detail?r=203
you can build Maratis from source to get the latest version : http://wiki.maratis3d.org/index.php?tit … ng_Maratis
RakNet is a cross platform, open source, C++ networking engine for game programmer :
https://github.com/OculusVR/RakNet
Apparently one of the leading networking engine in the game industry,
and now in BSD License.
obj1 = getObject("obj1")
obj2 = getObject("obj2")

function onSceneUpdate()

    dir = normalize(getPosition(obj2) - getPosition(obj1))
    lookAt(obj1, dir, 1)

endlook-at is a behavior :
select your object in the editor > go to behavior tab > add a look-at behavior > set the name of the target
(except is you use the script I gave before, in this case copy/paste it on top of your script)
you can start by setting the gravity every frame to this vector : normalize(sphereCenter - playerPosition)*0.98
You can use the look-at behavior :
- create an invisible object called "dummy"
- add a look-at behavior to your first object and set the target to the dummy
- in script, set the dummy X and Z position to be the X and Z position of the object you want to point at
- set the dummy Y position to 0 or to your first object Y position
Or use some math in pure lua, but it's more complicated (this example rotate on Z axis) :
-- get 2d vector length
function getLength2d(vec)

    return math.sqrt(vec[1]*vec[1] + vec[2]*vec[2])

end

-- normalize 2d vector
function normalize2d(vec)

    length = getLength2d(vec)
    vec[1] = vec[1] / length
    vec[2] = vec[2] / length
    return vec

end

-- lookAt
function lookAt(object, dir, rotSpeed)

    -- compute object X dir and Y dir
    rot = getRotation(object)

    zAngle = math.rad(rot[3])
    sinZ = math.sin(zAngle)
    cosZ = math.cos(zAngle)

    YDir = normalize2d({sinZ, -cosZ})
    XDir = {-YDir[2], YDir[1]}

    -- dot products for orientation and angle
    ori = (dir[1]*XDir[1] + dir[2]*XDir[2])
    angle = math.acos(dir[1]*YDir[1] + dir[2]*YDir[2])

    if ori < 0 then
        angle = - angle
    end

    rotate(object, {0, 0, 1}, math.deg(angle) * rotSpeed)

endMaratis forum » Posts by anael
Powered by PunBB, supported by Informer Technologies, Inc.
Currently installed 3 official extensions. Copyright © 2003–2009 PunBB.